Cognito User Pools, Google federation and AWS Amplify
Contents
In the previous article, we saw how to secure an API Gateway endpoint using Cognito user pools. We used the built-in capabilities of the user pools to create the users, sign them up, etc. But many applications nowadays don’t create users on their own; they use [social login] and rely on third-party social services such as Facebook or Google to manage users for them.
In this article, we’ll see how we can adapt our previous code to allow users to sign-up and sign-in to our service using their Google account.
Google API Configuration
Both in the Google configuration and the Cognito configuration, we’ll need to specify a valid domain for our user pool. We can use a custom domain, but for now, we’ll stick to the domains AWS allows us to create easily. The limitation here is that we need to use a unique domain in the user pool region. The only way that I know right now is via the AWS console. So, go to the console and create a user pool (you can use whatever the name you want, as we’re going to delete it straight away). Then, click on the Domain name menu option under App integration and enter the subdomain name you prefer there. Click on the Check availability button to ensure the domain is unique, take note of it, and delete the User pool. If you know how to do this using the CLI, please let me know in the comments.
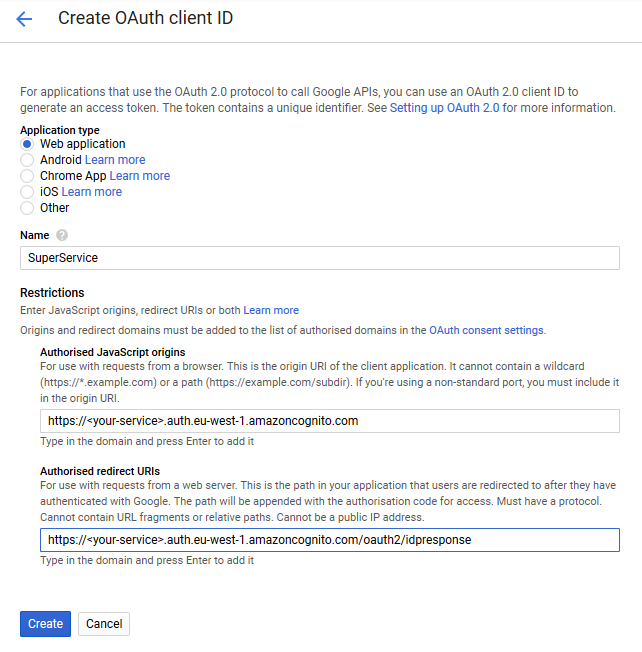
We’re ready now to configure a new Google app that we’ll link to our user pool. Go to the Google developer console, click on the Credentials menu, click on Create credentials and select the OAuth Client Id option. Select Web application and fill the form:
- In Name, write your service name or something that makes sense to you.
- In Authorised JavaScript origins, write https://
.auth.eu-west-1.amazoncognito.com, where your-service is the subdomain we created previously. - In Authorised redirect URIs, write https://
.auth.eu-west-1.amazoncognito.com/oauth2/idpresponse
Click on Create and select the application from the list to see the Client ID and the Client secret. Write them down because we’re going to need them.
Cognito User Pool
Now it’s time to update our user pool in the serverless.yml. We will need to change the User Pool Client, and we’ll need to create a domain name and an identity provider.
User Pool Client
In this section, we’ll need to set up the bits we need to set up Google and OAuth. So, add this to our previous definition of the user pool client.
|
|
What we’re setting is the information you will see under the App Client Settings menu entry of the User Pool in the AWS console. We’re saying that we want integration with Google, our callbacks URL’s (change them to something appropriate for you), the allowed scopes, and the implicit grant OAuth flow.
Domain name
We’ll need to create a new cloudformation resource on the serverless.yml file. It should be something like this:
|
|
Make sure that what you put in the Domain name is the same that you put in the Google configuration. You don’t need the auth.eu-west-1.amazoncognito.com here, just the subdomain name
Idnetity provider
Now it’s time to add the identity provider. Let’s put this in the serverless.yml file:
|
|
The bits that will change between providers will be the ones inside ProviderDetails.
We can now redeploy the user pool. The id and the application id shouldn’t have change, but make sure that they are the same that you’re using in your authenticated endpoint as authenticator and the ones that you have in the client application as the Auth configuration (take a look at the previous article if you need help with this)
Client App
The client app will change a little bit. Now we won’t have a separate sign-up and sign-in button, as everything will go through our social login. In terms of code, the only change will be the function we’ll use to sign in the user. Let’s go step by step.
The first thing will be to add a new piece of configuration to Amplify. So, go where you’re calling the configure function and this to the object you’re passing:
|
|
Now, Amplify will know where to go when we ask it to use social login.
And finally, let’s write the function that will respond to a click on the new button we’ve created.
|
|
With this, you’ll be redirected to Google to authenticate and, once you’re authenticated, it will get you back to http://localhost:8080 with the user signed in (or signed up and signed in).
Summary
In this article, we’ve seen how we can use Google as social login for our application. The documentation in Cloudformation and Amplify has some gaps, so hope this helps!
Author Vicenç García
LastMod 31-10-2019