This week I wanted to investigate how to use a Pub/Sub mechanism in an on-premise environment without needing to install anything else in our infrastructure, so using a managed service. I also wanted to make my first tests with CDK. Let me show you what I did.

Goal

What I want to accomplish is that a system that lives in our infrastructure communicates asynchronously with another system on it. It’s easy to simulate the sender of the message with a console application, but for the receiver I’ll need a public HTTP endpoint. The easiest way I know to have a public HTTP endpoint is by having a Lambda function published via API Gateway, so let me do this. The experiment is still valid because, at the end, is just an HTTP endpoint.

Lambda function using .NET Core

I took advantage of the situation to develop a lambda function in .NET Core for the first time. I’ll be using the Serverless framework so you need to install and configure it. Once you’ve done that, create a folder for the entire system (I’ve called it SNSSample) and type this command in your preferred terminal:

1
serverless create --template aws-csharp --path ReceiveSNSNotification

This will create the barebones of a Lambda function in .NET Core. To accomplish our mission, we’ll need to add a couple of NuGet packages:

1
2
dotnet add package Amazon.Lambda.APIGatewayEvents
dotnet add package AWSSDK.SimpleNotificationService

We need the first one to be able to have the needed request and response objects for API Gateway. We need the second one to be able to parse an SNS message.

And now it’s time to take a look at the code of the function

 1
 2
 3
 4
 5
 6
 7
 8
 9
10
11
12
13
14
15
16
17
18
19
20
21
22
23
24
25
26
27
28
29
30
31
32
33
34
35
36
37
38
39
40
41
42
43
44
45
46
47
48
49
50
using Amazon.Lambda.Core;
using Amazon.Lambda.APIGatewayEvents;
using System.Collections.Generic;
using System.Net.Http;
using System.Threading.Tasks;

[assembly:LambdaSerializer(typeof(Amazon.Lambda.Serialization.SystemTextJson.DefaultLambdaJsonSerializer))]
namespace AwsDotnetCsharp
{
    public class Handler
    {
       public async Task<APIGatewayProxyResponse> Hello(
APIGatewayProxyRequest request, ILambdaContext context)
       {
          context.Logger.LogLine("Let's try this thing");
          context.Logger.Log(request.Body);

          var message = Amazon.SimpleNotificationService.Util.Message.ParseMessage(request.Body);

          if (message.IsSubscriptionType)
          {
              context.Logger.LogLine("Subscription notification" + message.SubscribeURL);
              HttpClient client = new HttpClient();
              HttpResponseMessage notificationResponse = await client.GetAsync(message.SubscribeURL);

              context.Logger.LogLine("Subscription responded with " + notificationResponse.StatusCode);
          }
          if (message.IsNotificationType) // PROCESS NOTIFICATIONS
          {
              context.Logger.LogLine("Notification!");
              context.Logger.Log(message.MessageText);
          }

          //do stuff
            
          var response = new APIGatewayProxyResponse
          {
              StatusCode = 200,
              Body = "Hello from .net",
              Headers = new Dictionary<string, string>
              { 
                  { "Content-Type", "application/json" }, 
                  { "Access-Control-Allow-Origin", "*" } 
              }
          };

          return response;
       }
    }
}

When you create an HTTPS subscription in SNS, you need the subscription to be confirmed by the receiver endpoint. The way to do that is to visit the URL that SNS sends to it in the confirmation message. That what we do in the first part of the function.

Once the subscription is confirmed, you will receive the message and you’ll be able to do what you need with it.

The last step is to correctly configure the serverless.yml file, which should look like like this:

 1
 2
 3
 4
 5
 6
 7
 8
 9
10
11
12
13
14
15
16
17
18
19
20
21
service: receivesnsnotification

provider:
  name: aws
  runtime: dotnetcore3.1
  region: eu-west-2

package:
  individually: true

functions:
  hello:
    handler: CsharpHandlers::AwsDotnetCsharp.Handler::Hello

    package:
      artifact: bin/Release/netcoreapp3.1/hello.zip

    events:
      - http:
          path: notification
          method: post

Nothing super-special here, we just need an endpoint that responds to a POST request.

Let’s deploy this! First, we need to build the package. To build it, we can use the script that the Serverless framework has created for us:

1
.\build.cmd

And now, we can deploy the lambda function. In my case, I have a profile configured called serverless-local so I need to type this:

1
serverless deploy --aws-profile serverless-local

Make sure you write down the URL of the Lambda function because we’ll need it.

SNS Topic

The next step is to create the SNS topic. We’ll use CDK to do this.

Let’s first create a folder just below our main folder called IaC. Go inside the folder and run the following command:

1
cdk init --language csharp

This will create the barebones of a CDK project using C# as a language to define your infrastructure.

In order to create an SNS endpoint, we’ll need a couple of NuGet packages. Type these commands in the IaC\src\IaC folder:

1
2
dotnet add package Amazon.CDK.AWS.SNS
dotnet add package Amazon.CDK.AWS.SNS.Subscriptions

It’s time to define our infrastructure, which is basically an SNS topic with a HTTP subscription:

 1
 2
 3
 4
 5
 6
 7
 8
 9
10
11
12
13
14
15
16
17
18
using Amazon.CDK;
using Amazon.CDK.AWS.SNS;
using Amazon.CDK.AWS.SNS.Subscriptions;

namespace IaC
{
    public class IaCStack : Stack
    {
        internal IaCStack(Construct scope, string id, IStackProps props = null) : base(scope, id, props)
        {
            Topic topic = new Topic(this, "SNSCDKTopic", new TopicProps {
                DisplayName = "Sample subscription topic"
            });

            topic.AddSubscription(new UrlSubscription("https://xxxxxxx.execute-api.eu-west-2.amazonaws.com/dev/notification"));
        }
    }
}

Quite easy, isn’t it?

In a production environment you’d need to configure retries and DLQ. We’ll see that in future posts.

Go back to the main IaC folder and deploy the infrastructure:

1
cdk deploy --profile serverless-local

If you now go the AWS Console, you will see that the subscription is confirmed Confirmed subscription

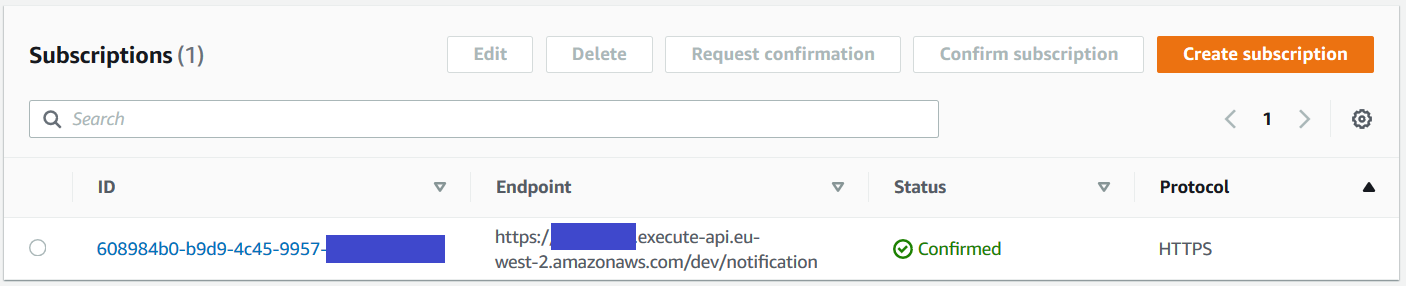
And if you go to CloudWatch you’ll see that the endpoint has been called. Confirmed subscription

Please, go to the AWS Console and write down the ARN of the SNS topic because we’ll need it in the next step.

Sending messages

Now it’s time to send a message to the topic. Go to the root folder and create a Console App:

1
2
3
4
dotnet new solution -n SendSNSNotification -o SendSNSNotification
cd SendSNSNotification
dotnet new console -n SendSNSNotificationApp
dotnet sln add SendSNSNotificationApp\SendSNSNotificationApp.csproj

Go inside the folder and add the following packages

1
2
3
4
5
6
dotnet add package AWSSDK.Core
dotnet add package AWSSDK.Extensions.NETCore.Setup
dotnet add package AWSSDK.SimpleNotificationService
dotnet add package Microsoft.Extensions.Configuration
dotnet add package Microsoft.Extensions.Configuration.FileExtensions
dotnet add package Microsoft.Extensions.Configuration.Json

Create an appsettings.json file with the following structure (use your profile and the region you preffer):

1
2
3
4
5
6
{
    "AWS": {
      "Profile": "serverless-local",
      "Region": "eu-west-2"
    }
}

And make sure the file is copied to the output directory by adding this to the csproj:

1
2
3
4
5
<ItemGroup>
  <Content Include="appsettings.json">
    <CopyToOutputDirectory>PreserveNewest</CopyToOutputDirectory>
  </Content>
</ItemGroup>

And finally, write the code to send the message:

 1
 2
 3
 4
 5
 6
 7
 8
 9
10
11
12
13
14
15
16
17
18
19
20
21
22
23
24
25
26
27
28
29
30
31
32
33
using System;
using System.Threading.Tasks;
using Amazon.SimpleNotificationService;
using Amazon.SimpleNotificationService.Model;
using Microsoft.Extensions.Configuration;
using Microsoft.Extensions.Configuration.FileExtensions;
using Microsoft.Extensions.Configuration.Json;

namespace SendSNSNotificationApp
{
    class Program
    {
        static async Task Main(string[] args)
        {
            IConfiguration config = new ConfigurationBuilder()
                .AddJsonFile("appsettings.json", true, true)
                .Build();

            var options = config.GetAWSOptions();
            var snsClient = options.CreateServiceClient<IAmazonSimpleNotificationService>();

            var request = new PublishRequest
            {
                Message = $"Test at {DateTime.UtcNow.ToLongTimeString()}",
                TopicArn = "arn:aws:sns:eu-west-2:xxxxxxxxx:IaCStack-SNSCDKTopic5427996C-1GCQIX0GC8ICE",
            };

            await snsClient.PublishAsync(request);

            Console.WriteLine("Message sent");
        }
    }
}

As you can see, we’re loading the configuration file and using the GetAWSOptions to get an object which can be used to create the client. Finally, you just need to create the request and send it. If you want to do the same in a ASP .NET Core application, you can follow this post by Steve Gordon.

You can now build and run the application

1
2
dotnet build
dotnet run

and take a look at cloudwatch to see that the message is there!

Confirmed subscription

Summary

In this article we’ve seen how to create an SNS topic, subscribe to it and send a message to it. You can use this to send asynchronous messages between your services, even if they are deployed in your own infrastructure. Hope it helps!