Set up a multi-region active-active backend
Contents
Congratulations! Your startup is starting to bring attention to many people and you’re starting to have clients from different countries and continents. But your lambdas and API gateway are still in your initial region, and that might add some latency to some users. Apart from that, you want to increase the reliability of your system. So, you decide to go multi-region. Can you do that easily? In this article, we’ll see how to do that.
Disclaimer This article is a based in this article from Adrian Hornsby (who is Principal Evangelist at AWSCloud). I usually write to articles to be able to learn and put in practice what I learn, joining information from different souces. In this case, the only source is Adrian’s article, and I added some automation using the Serverless framework. So, please, if you want to read the full story, go and read Adrian’s article (and follow him on twitter!!).
DynamoDB Global Tables
DynamoDB Global Tables allows us to create multi-region multi-master tables. DynamoDB will replicate our data accross all the regions we specify, and we won’t need to worry about anything.
So, first thing is to create a new service with a DynamoDB table with streaming enable. Something like this:
|
|
And we need to deploy this in two regions, let’s say eu-west-1 and us-east-1. So, go to your project.json file and create the following scripts:
|
|
(change serverless-local for the profile you have configured in your laptop, if you have any.)
Now you can run yarn run deploy:europe and yarn run deploy:us and see your tables created in both regions. The next step is to create the Global Table. Unfortunately, you can’t do that via Cloudformation, and we need to call an API. So, go again to your package.json file and add the following script:
|
|
To check that it’s working, add manually in the console (or via api or script) an item (id and name) to one of the tables, and see how it gets replicated in the other one. You’ll see that DynamoDB has added three of fields, one of them being aws:rep:updateregion, where we’ll see the region where the item has been created.
API
Let’s create the API now. We’re going to create and endpoint to put items on DynamoDB and another one for getting them. We’ll also need a status endpoint that we’ll use later. Let’s add the functions to the serverless.yml file, which should look like this:
|
|
As you can see, we have three funtions here. The health function just takes a value from an environment variable which you shouldn’t do in a real-life scenario.
This is the code of the PutItem function:
|
|
This is the code of the GetItem function:
|
|
And, finally, this is the code of the health function
|
|
Looks great, isn’t it? Deploy this service in the same regions we first deployed the DynamoDb tables, us-east-1 and eu-west-1.
Regional endpoints, certificates and custom domain names
A regional endpoint is an endpoint that improves the latency when the requests are originated from the same region as the API. We can create them with the serverless-domain-manager plugin that we saw in the previous article. Check that article and create a certificate for our endpoints. In this case, as we’re using regional endpoints, you must create the same certificate in each region you want to deploy the API. In my case, I used the name multiregion.authenticatedservices.net. Validate the certificate and update the serverless.yml file to include the custom domain part. The difference with the previous article is that now, we don’t want to create the record in Route 53 and that the type of the endpoint will be regional.
|
|
Add a couple of scripts in the package.json file to create the domains:
|
|
And call them both to create the domains. After waiting up to 40 minutes, you can redeploy again the API in both regions. When you do that, you will see an output like this:
|
|
Please, take not of the target domain for both regions because we will need them.
You can now test both APIs and make sure they work (they should!).
Health checks
We will now need to create a health check for each endpoint in Route 53. Route 53 will use these health checks to decide if it can route traffic to that endpoint.
I created a new project in a new folder to do this, because I thought it shouldn’t be part of my service. This new serverless.yml file looks like this:
|
|
You can create both health checks in the same file, or you can do like this and deploy twice. It’s up to you. You need, obviously, to change the url of the endpoints to the ones you got when you deploy. You can chech that the creation has been successful in the Route 53 service on the AWS Console.
Route policy
Before adding the policy we need to grab the target domain name from the endpoint. If you followed the article, you will have them from a previous step. If you’ve lost it, go to the Amazon API Gateway service on the AWS console and select Custom Domain Names. Click on your domain and you should see something like this:
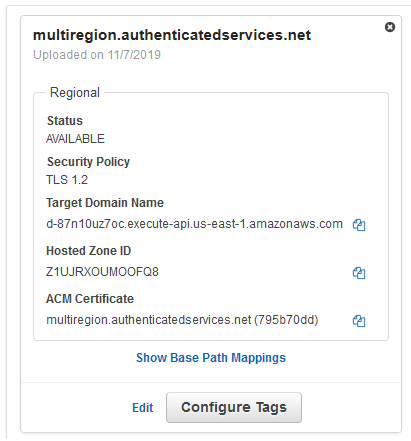
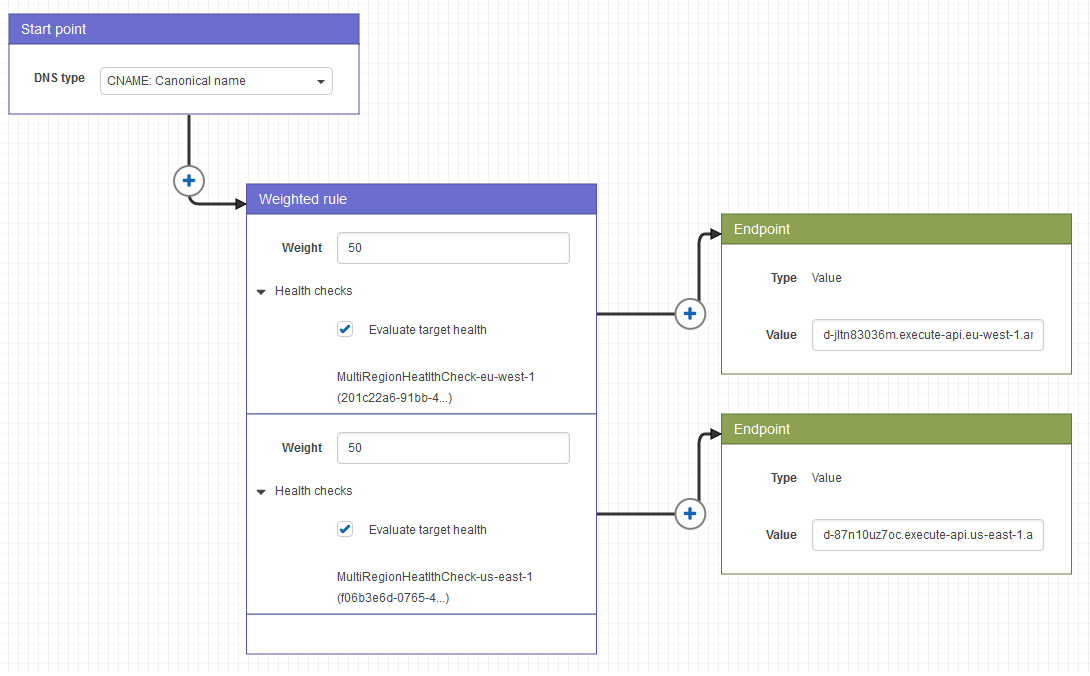
It’s now time to create the policy. Go to Route 53 and select Traffic policies and create a new one that should look like this:
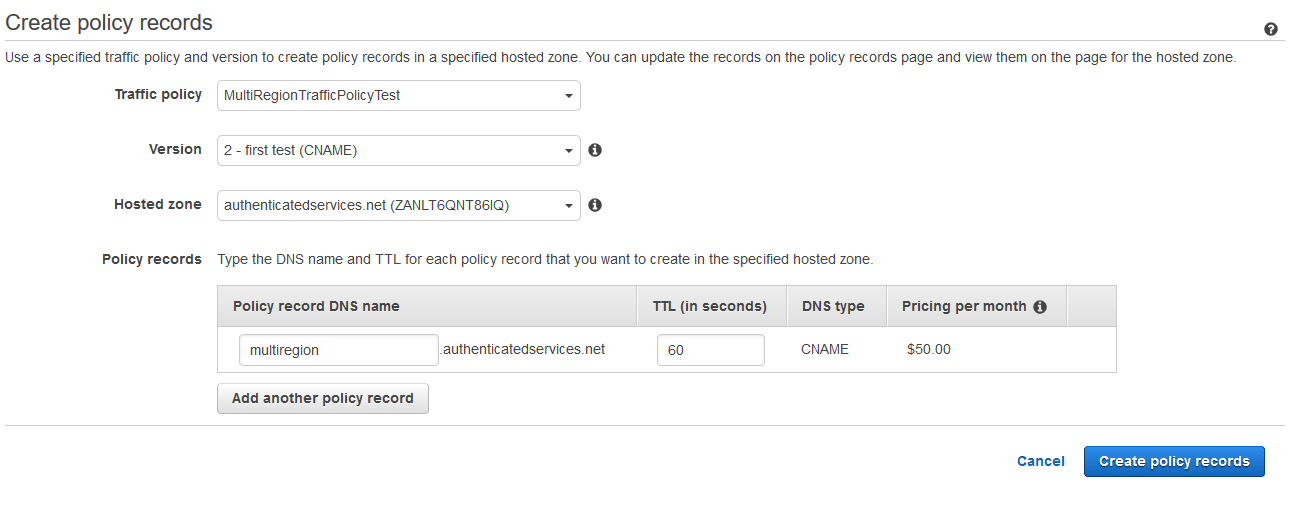
At the end of the policy creation, or afterwards, you need to create a policy record. Create one with the new traffic policy and with your DNS name (the one that you’ve chosen when you created the certificate), in my case, multiregion.authenticatedservices.net. (Be careful because it has costs associated)
And we’re done!!
Testing
How can we test it? Assuming you’re in Europe, what we’re going to do is to bring down that endpoint and create a new item. When we get that item we’ll see that it was created in the us-east-1 region.
To bring down the endpoint, we need to make Route 53 believe that the endpoint is down. So go to the health Lambda function of the eu-west-1 region in the AWS console and change the status environment variable to 404. Wait until the health check returns failure and create a new item, in my case making a post call to https://multiregion.authenticatedservices.net/item with a body like
|
|
And now, if you go and get that item at https://multiregion.authenticatedservices.net/item/7 you should get back something like this
|
|
As you can see, the region is us-east-1 !!
Summary
In this article, we’ve seen how we can create a multi-region active-active backend. This is an adaptation of the original this article from Adrian Hornsby but trying to automate as many things as we can.
Hope it helps!!
Author Vicenç García
LastMod 08-11-2019